Friday, November 29, 2013

Learning to Sew: Scruchies

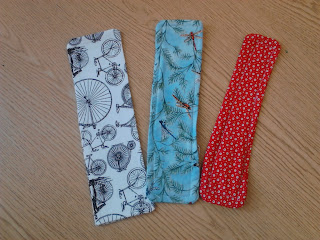
You read that right, I'm bringing back the scrunchie! :) But first, check out the bookmarks my kids made....  see that tutorial, here.

 
Let me start by sharing the same back story I shared with my kids. Sometimes I debate whether or not I should 'waste' time telling the kids these stories, but several mentioned to me at the end of Sewing Club that they liked hearing all about Ms. Wooten's Granny Woot and wanted me to tell them more stories while we waited on their parents to pick them up. :) It's the small things that makes me happy sometimes... Anyway, back to my story.

I really started sewing regularly during middle school. At that time I got off the bus at my Granny Woot's house and spent the afternoon with her until my parents got off work. While Granny didn't have internet or a working DVD player, she did have several additional fun things I managed to get myself into. (Ivy tunneled gardens, rows of corn with hidden snails, record players with tons of records, a giant pantry, her 'office,' the list goes on...) One of the things I was drawn to was her 60's model Singer Touch & Sew. I had grown up around fabulous seamstresses and I loved watching my mom sew beautiful costumes, dresses, clothes, etc. With a lack of modern technology, the sewing machine called to me, begging me to sit down and create. I rummaged through one of Granny's many cabinets until I came across a beginner sewing video. I fired up the VCR and began my first wearable project, a scrunchie. I must have made several hundred scrunchies, I seriously think everyone I'd ever come in contact with owned at least one of my custom scrunchies, regardless of their gender or hair length.

Ever since then scrunchies have always held a special place in my heart. Initially a scrunchie was going to be my first kids project in sewing club, however when I realized how many boys I had I decided to save it. I wanted their first project to be something everyone could use.

After the bookmarks, all the kids were hooked and the boys were okay with 'girl' projects. They either used 'boy' fabric so they could wear them as bracelets, or they sewed scrunchies for loved ones in their lives.
They really are fairly simple to create. The fabric is 16"x4" and the quarter inch elastic is about 3 inches long. (That's a rough estimate I just kind of wrap it comfortably around my wrist and snip.) You're welcome to use my instruction sheet, if you can't print it from the website email me and I can send it as an attachment. Enjoy!


 ~ Farm Girl Teacher
Monday, November 25, 2013

My First Crochet Sweater!

I was very VERY excited to finish my first crocheted sweater last week! So excited that I wore it despite the 80 degree temperatures... (: I've crocheted shrugs in the past, but I've never taken on something as daunting as a sweater...until a few weeks ago that is!

I love the color of the yarn and the fact that it's wool. Spinning yarn more avidly has inspired me to learn more about fiber. Did you know that wool is known for wicking moisture quickly? That makes it cooler in the summer and warmer in the winter. It also means that wool tends to be lighter-weight, even when sopping wet. I thought this was particularly interesting because many years ago bathing suits were woolen! (pre-bikini days)

The pattern came from this book.

A huge part of the reason I've never taken on a sweater is because it's very nerve-wracking and I've heard so many stories or sweaters-gone-wrong. (Don't lie, you know you've all told jokes about Aunt Sally's famous crocheted Christmas sweaters, lol) I hate to admit it but my reluctance, well, refusal, to take on a sweater was built on fear of failure and I just don't like that. A few months ago I decided to overcome this and took a very tiny step...purchasing the above book. This book is awesome because it gives really thorough lessons on how to alter sweater to fit you better. Actually it's all-around awesome for everything you need to know about crochet sweater construction, I've already learned quite a bit...and was apparently inspired by the cover... :D

The sweater primarily consists of double crochet stitches in a diagonal pattern making it fairly quick to complete. I am also hoping that it isn't too hot to be worn during the summer, maybe with a tank top?

The slight taper in the waist is done by changing to a smaller hook in the waist area, I thought this was super clever... (:

Overall I'm pleased with the sweater. Naturally there are things I would change, I'll be honest, it's not my favorite, but I'm proud to have completed my first sweater and have overcome my sweater-making fears! :)

Have a safe and happy Thanksgiving! :)
~Farm Girl Teacher

Saturday, November 23, 2013

Owl Laptop Sleeve Pattern

I'd like to say I just finished this pattern, but quite honestly this pattern was finished several months ago and I've been too lazy to post it. :D Anyway, without further adieu, I present to you the Owl Laptop Sleeve....


This pattern was inspired to match the owl phone case I made originally... (click here)


Like the phone case, the wings double as pockets, and the soft crochet sleeve protects the laptop from everyday wear and tear. (In my case, I wanted protection from scratches!)


As you can see, I chose to combine a hard plastic case that can be worn at all times with the sleeve while transporting. The case easily accommodates several laptop sizes, with and without additional protective cases.


So far the case has worked wonderfully for me (I use it every day) as I can carry papers and my grade book in the sleeve with the laptop, and pens, chargers, a wireless mouse, my thumb drive, and headphones in the wing pockets.

The pattern is simple (I promise!) and as usual I am more than happy to help anyone who gets stuck in a particular area. I also provide modification instructions for different laptop sizes. Please visit my Craftsy or Ravelry shops to purchase the pattern for $3.00. As always please email me if you get stuck, or if you'd like to discuss purchasing a finished product rather than the pattern. (thatfarmgirlteacher@gmail.com) Hope you enjoy! :)
~Farm Girl Teacher

Arm Knitting-The 30 minute scarf!

A scarf in 30 minutes? Definitely possible!

My two favorite models, Cole and Joann! :)
While recently browsing knitting videos on YouTube, I came across a technique called Arm Knitting. This method of knitting requires you to use your arms in place of knitting needles. Naturally, this produces a much different, but interesting effect. Well you know me, I HAD to try this for myself... (:

***I really encourage you to attempt to learn this technique yourself, however if arm knitting just isn't for you, email me about purchasing a handmade scarf at thatfarmgirlteacher@gmail.com. If you live locally purchase two skeins or Bulky or Super Bulky yarn (The label will tell you what size the yarn is) at a Walmart, Michaels, Joann's, Target, or Kmart. Give me the yarn and $10 and I will return a finished scarf to you within two days. ***


This video is the one I used for my own scarves. I've viewed several, and I think she has the clearest instructions and shows the technique from multiple camera angles. I also make mine by casting on 12 sts, however the number of rows varied depending on the look I was going for.

I'm sure you'll notice I was inspired by Audra's pretty red scarf...This burgundy yarn is size Super Bulky (6).


 This was my first scarf, it took about an hour because I was confused by the casting on instructions and going slowly as I was still learning.

I love that belt! I think I've had it since middle school :)

The second I made for my mom using size Bulky (5) yarn. The yarn itself is variegated, I didn't change colors or anything fancy.


She wears all these colors all the time, it looks perfect with so many of her outfits!

Of course once I had one, and my mom had one, my sister asked me where hers was...


The scarf is made from two strands of yarn held together, so she chose to use two separate colors, Super Bulky (6) to match a jacket she likes to wear. This technique would also look awesome in school colors!

And because I just couldn't get enough of this arm knitting business....


This one was a bit shorter than the other and could also be worn without being looped.


I knew when I saw this yarn at Michaels exactly what I wanted to do with it...I originally bought it to attempt an arm knit blanket for my mom for her birthday. (This is a real thing, shared by one of the other YouTubers with an arm knit video) Well it was absolutely HORRIBLE. I think the blanket the other girl made was just a 'look pretty.' You couldn't use it at all because it didn't hold a shape, and anytime I actually tried to cover myself with it, my foot went through one of the many giant holes....I wound up ripping out the yarn and making two scarves, a short one (shown above) for me, and a longer one for mom.

The technique is super easy and doesn't really require any knitting knowledge. Hope you enjoyed!

P.S. Looking back over my previous posts, I can't believe I was actually lacking in projects not long ago...I am now drowning in a crafty to do list! Next time I post something like that, please slap me back into reality! :)
~Farm Girl Teacher

Saturday, November 2, 2013

Learning to Sew: Beginner Worksheet and Bookmark

Sometimes, it can be difficult to determine where that 'square one' is that we need to start. Check out these things we used in sewing club, they are very useful for adults and for children!

My first suggestion for those of you who have never used a machine, or who have recently gotten a new machine, would be to remove all threads and stitch a paper first. This is a great way to get the feel for your machine, practice stitching straight lines/corners, and learn to 'steer' without pressure. I often do this myself on machines I've never used with notebook paper, however I created the following worksheet for my sewing club to provide better instructions, and to make it a little more interesting. When the kids first heard 'worksheet' they looked a bit disappointed, but when they realized they used a machine rather than a pencil to fill out this worksheet, I thought they might die from anticipation! :D


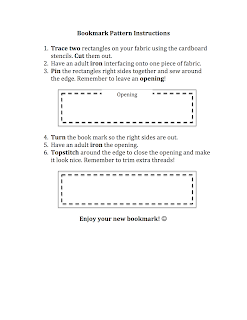
After students got a feel for the machine, they began their first project. Originally I was going to have students sew a scrunchie, but after realizing how many boys I had in the club, I decided to go for something more gender neutral first. I wanted something the students would actually be able to use, and landed on a fabric bookmark. The bookmark is perfect because it doesn't take a lot of supplies to make. (The most expensive part was the interfacing.) I made this pattern guide that I blew up using a poster maker. The students had to check the poster BEFORE they asked me for help. (So they learn to use their resources/gain self-sufficiency. Lol, what can I say, I'm a teacher first.)

You'll notice I didn't give measurements for the fabric rectangles, I pre-cut the interfacing and cardboard for them to use as a stencil. While I initially considered having them perfect their measurement skills, I want to prepare them to use a pattern piece on the next project. The fabric rectangles should be 9" x 3" the interfacing is 8.5" x 2.5" and the bookmarks have a quarter inch seam allowance. The students were responsible for determining the size of their opening, and they quickly learned that too small openings were a pain! :)
I hope you/your children love this as much as my students did. Let me know if you have any questions!
Happy Stitching! :)
~Farm Girl Teacher

More Than an Ability to Sew

"Develop a passion for learning. If you do, you will never cease to grow." -Anthony J. D'Angelo


As a teacher one of my goals is to develop a passion for learning within my students, however I think we so often view a passion for learning as limited to the capacity of schooling. This last week I started an after school club at the school where I teach so that I can share one of my passions with my kids. While talking with a coworker we began discussing how so many other life lessons can arise from this club. This new sewing club teaches basic sewing skills to our third, fourth, and fifth graders, but more than that, it teaches lessons of love, passion, learning, frustration, commitment, responsibility, acceptance, teamwork, sharing, community, pride, and humility.

love of a project containing our blood, sweat, and tears.
Passion for our craft, whatever it may be.
A love of learning how to develop our skills and further our abilities.
Skills to deal with frustration that occasionally accompanies a complex or difficult task.
A personal commitment to overcome frustrations and reach the finish line.
Responsibility necessary to accept one's own mistakes and shortcomings. 
Acceptance that we will always have shortcomings, but they need not inhibit our ambition.
Teamwork necessary to overcome hurdles together.
Sharing our knowledge with another to provide them with the support or knowledge they need to overcome their hurdles.
The love of the community that has donated materials or time to help us accomplish our goals.
Pride that comes only from sticking with and finishing a project or learning a new skill.
A certain amount of humility to keep our pride from overrunning us, often based in the knowledge that there is always something more we can learn, we will never have perfect knowledge. Instead, we will have something better, a drive to gain more knowledge.

I truly believe I am teaching so much more than an ability to sew. THAT is why I do what I do.

~Farm Girl Teacher

Like what you see?

I'm often asked if I will make custom projects or sell my work. The short answer is, yes.
My patterns are always free, but I do charge for projects mostly to cover the cost of resources, and my time. Basically, if you see something you like and want me to make it, I'd be happy to talk to you. The best way to contact me is through my email thatfarmgirlteacher@gmail.com. I can make nearly anything and I've had people in the past send me photos of what they're interested in. Time to make it, cost, and more can be discussed through my email and varies greatly based on what you'd like made.
I also sell my hand spun yarn at our local Farmer's Market. I don't really sell yarn online because my inventory varies greatly, however if you know you want something specific, I can usually work something out with you, again, just send me an email.